Router - First Time Setup
The first setup of most wavlink routers is very similar. We provide you with tutorials for different systems. You can choose the method that suits you according to the different devices.
New devices or reset devices need to log in to the administrator interface for initialization settings.
Tools required : wavlink router,phone,WavRouter APP(Scan the QR code on the user manual to download.)
1 . Scan the QR code on the user manual and download the WavRouter APP.
2 . After the download is completed, click to open the WavRouter APP.
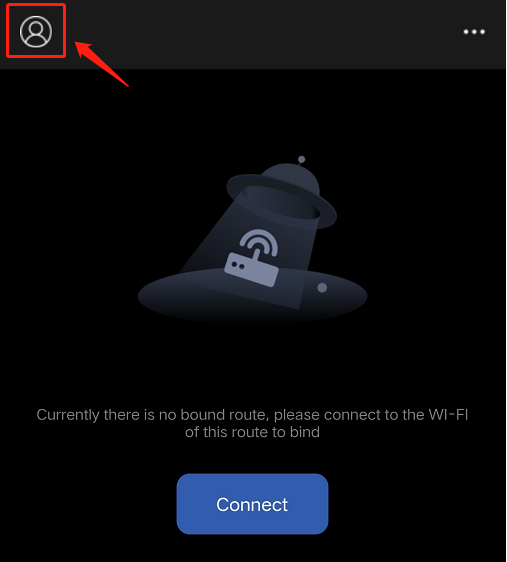
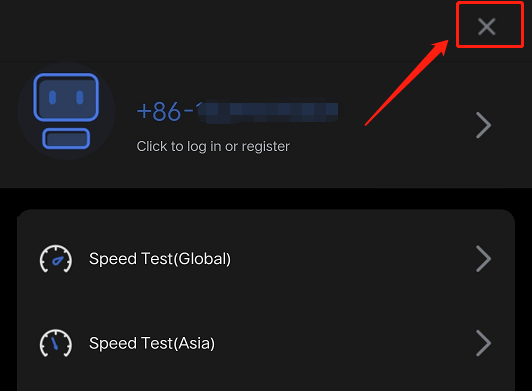
3 . Click this icon  in the upper left corner to open the extension bar, and click "Login/Registration" to enter the login interface.
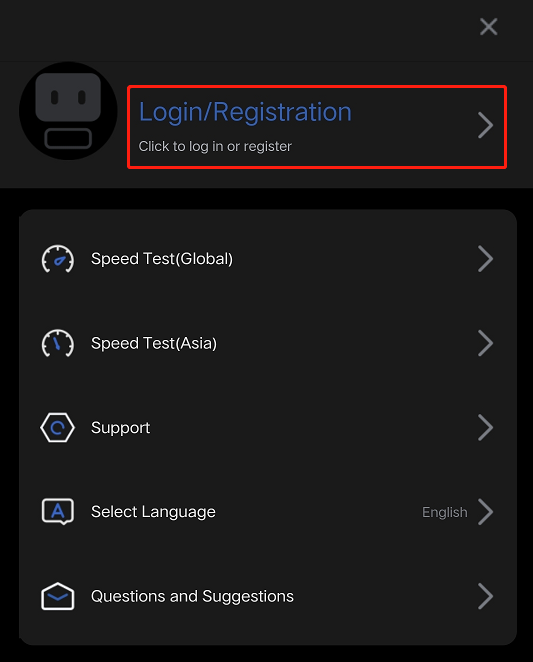
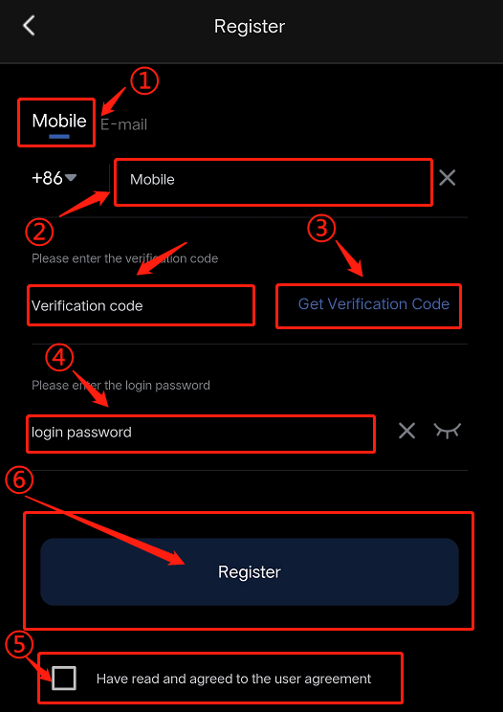
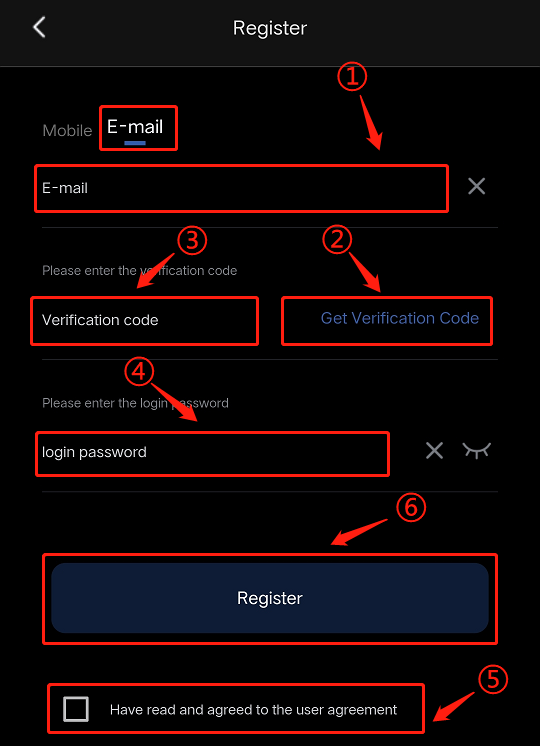
4 . Click "Register" to register a user. There are two ways to register a user. You can choose one of the following to register.
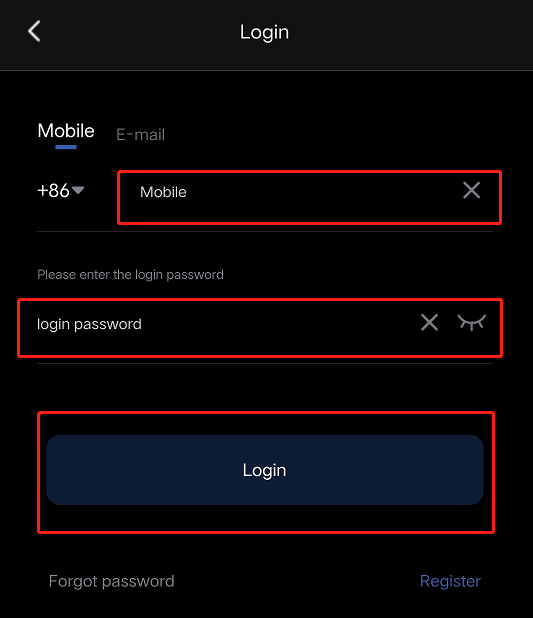
Tips : If you have an account, you can click to log in directly.
1 . Fill in your mobile phone number, click Get Verification Code.
2 . Fill in the verification code received on your mobile phone in the Verification Code line and set a login password. (it is recommended to use a password with numbers, uppercase and lowercase letters, and special characters).
Tips : If you have an account, you can click to log in directly.
1 . Fill in your email, click Get Verification Code,
2 . Fill in the verification code received in your email in the Verification Code line and set a login password (it is recommended to use a password with numbers, uppercase and lowercase letters, and special characters).
5 . After the registration is completed, log in as the user you just registered and click this icon  to return to the main interface (as shown below).
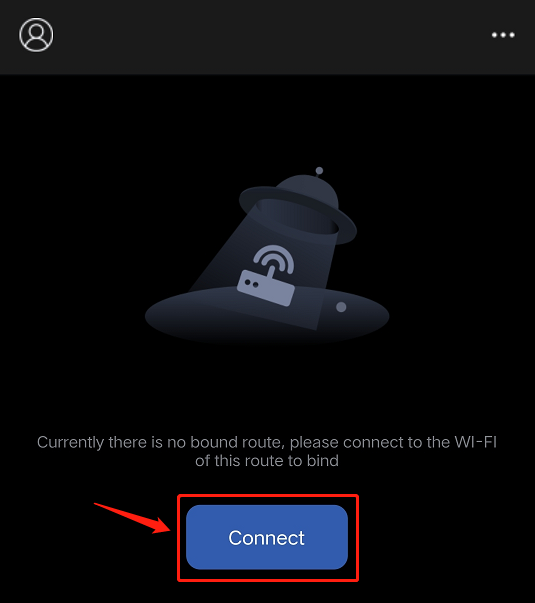
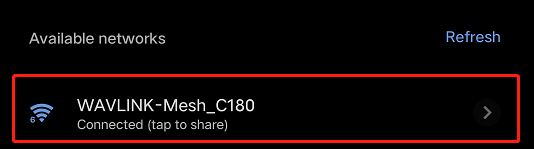
6 . Click "Connect" and it will automatically jump to the WiFi connection interface. You only need to correctly select your device WiFi and connect. Like the example below.(The WiFi name can be found in the user manual.)

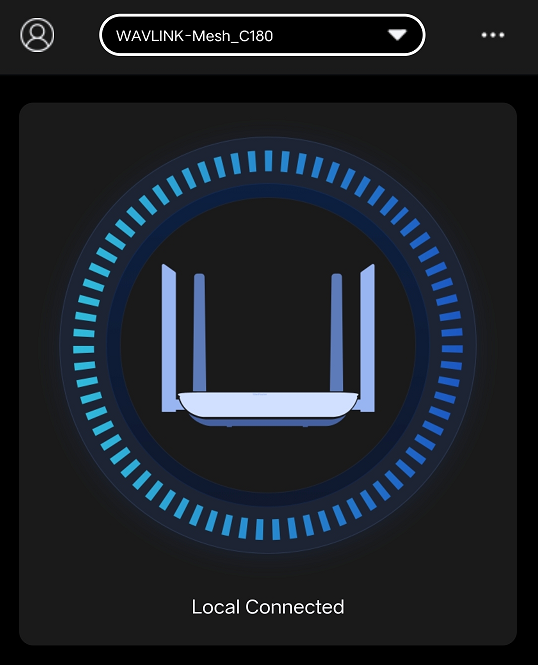
7 . After the connection is successful,click the return button on your phone to return to the main page, and Click "Local Connected" to enter the initial configuration..(Like the example below.)
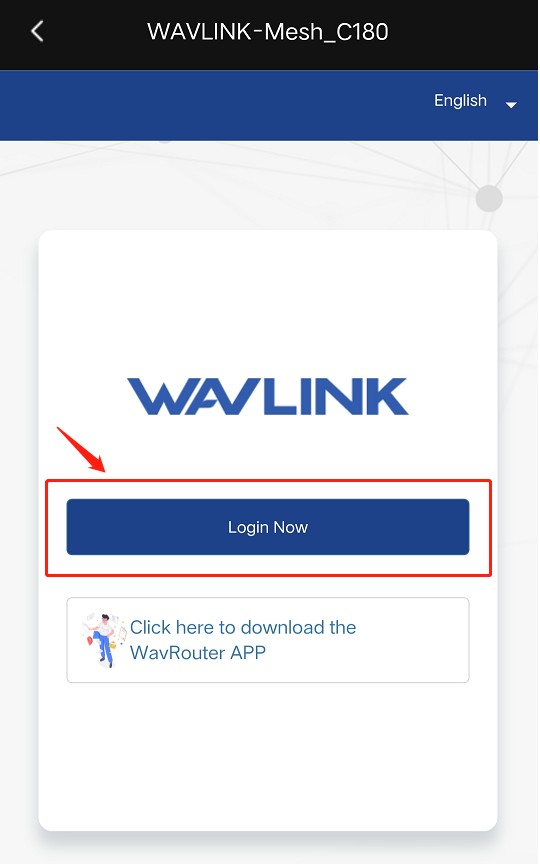
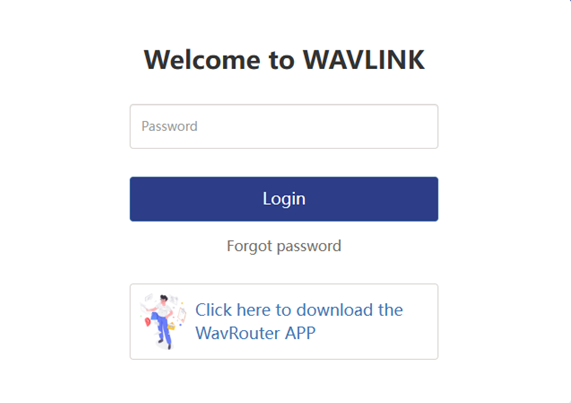
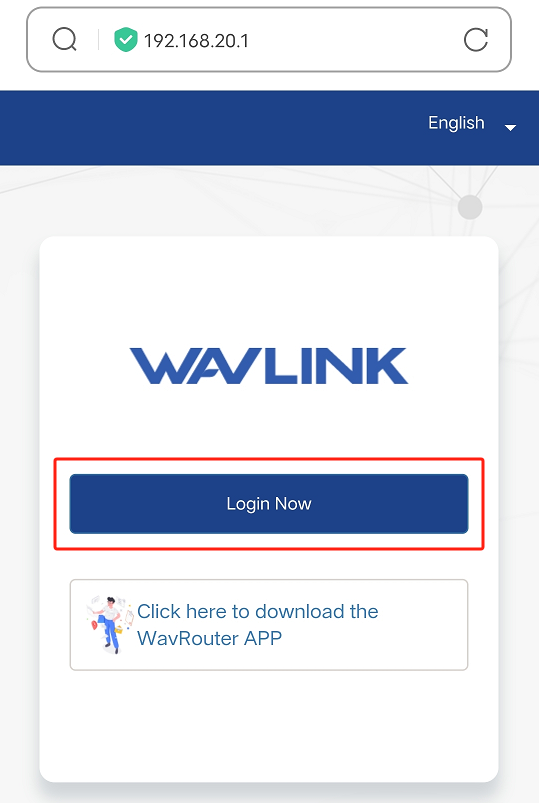
8 . Enter the default password admin and click "Login Now " to enter the first-time setup page.
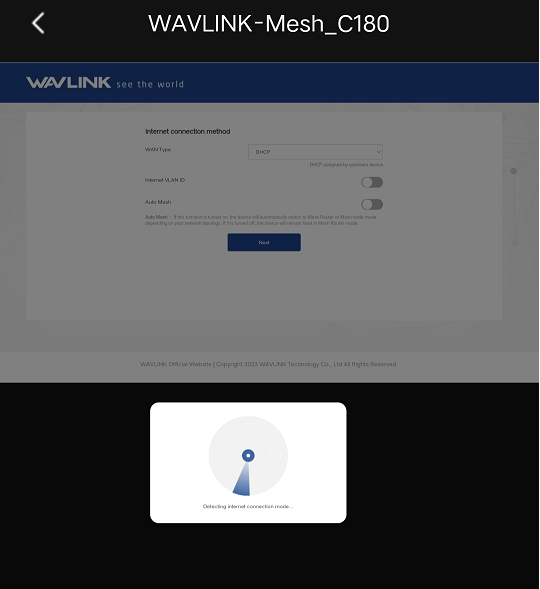
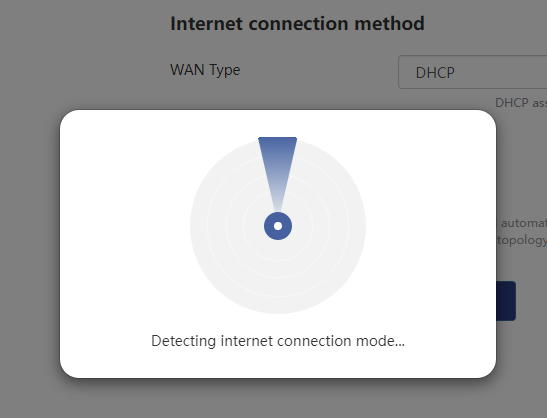
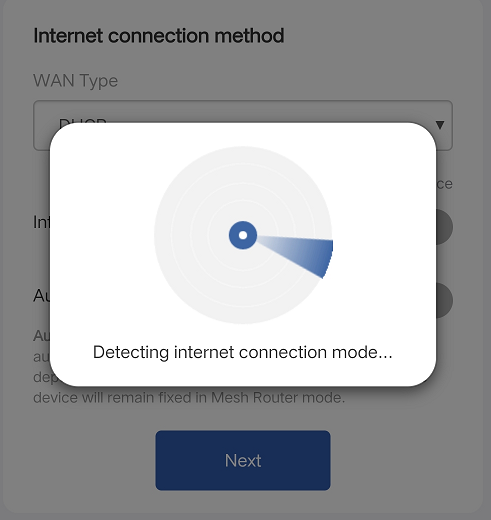
9 . After entering the initial configuration interface, the device system will automatically detect the Internet connection method for you. The Internet connection method defaults to DHCP. If you need to change the Internet connection method, please click the information box below.
-
Internet VLAN ID : Some ISPs require users to set a VLAN ID on the router before they can access the Internet. If you find that dialing fails or obtaining an IP from the ISP fails, please check whether you need to set a VLAN ID.
-
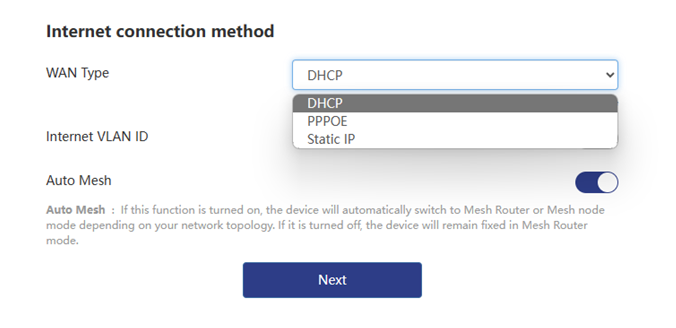
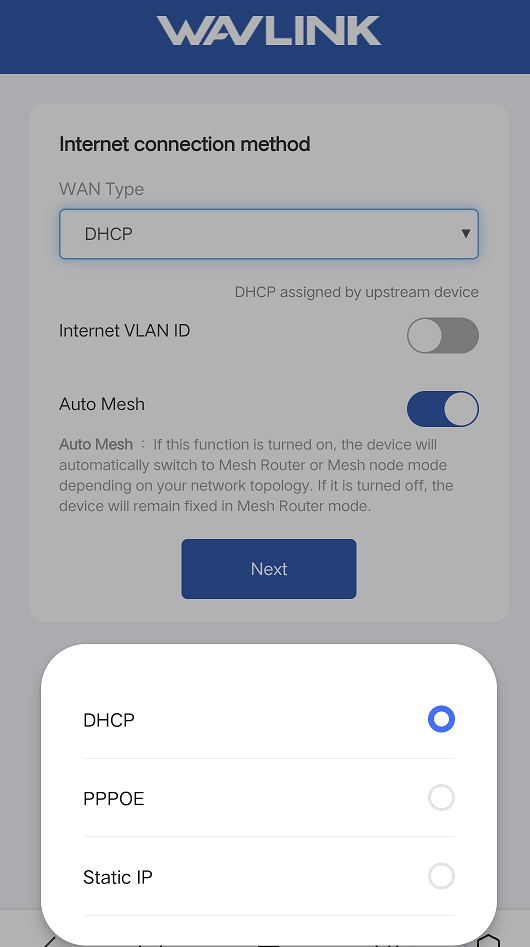
Auto Mesh : If this function is turned on, the device will automatically switch to Mesh Router or Mesh node mode depending on your network topology. If it is turned off, the device will remain fixed in Mesh Router mode.
Please click here to switch the Internet connection method
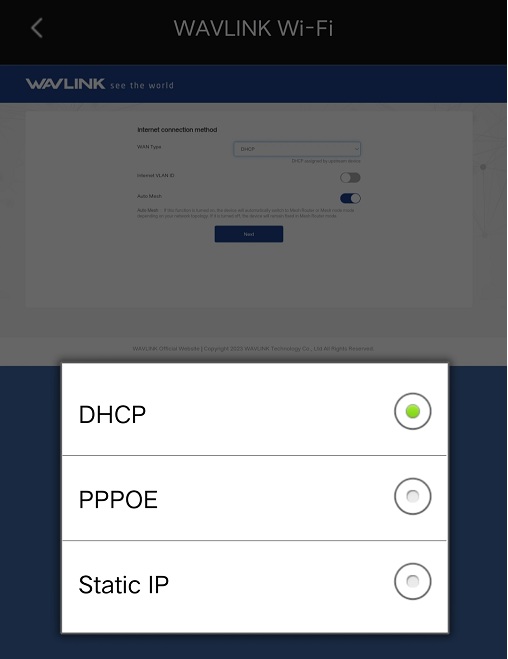
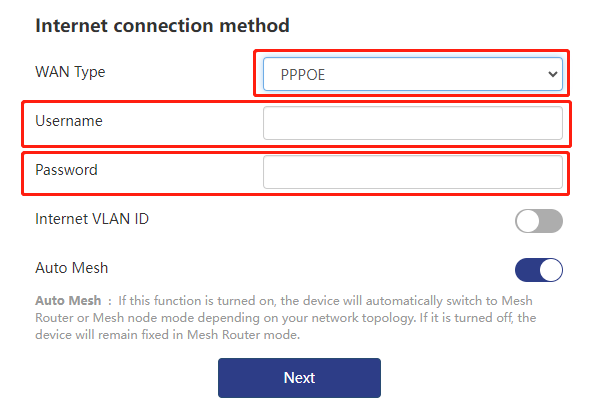
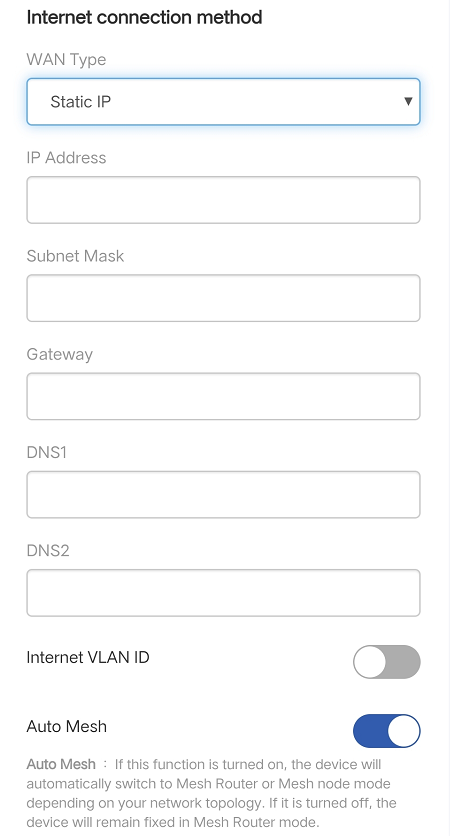
After entering the initial configuration page, you need to choose a internet connection method. DHCP is selected by default. If you need to connect to the Internet through dial-up, please choose PPPoE. If you need to configure a static IP, please choose Static IP. We have three internet connection methods. A link description is attached below, you can click on the link for details.
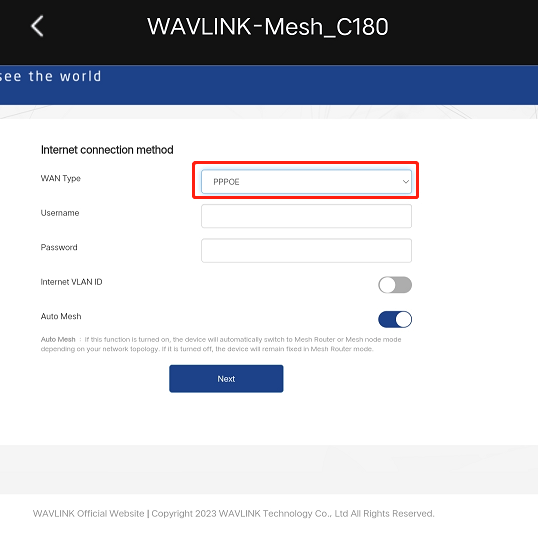
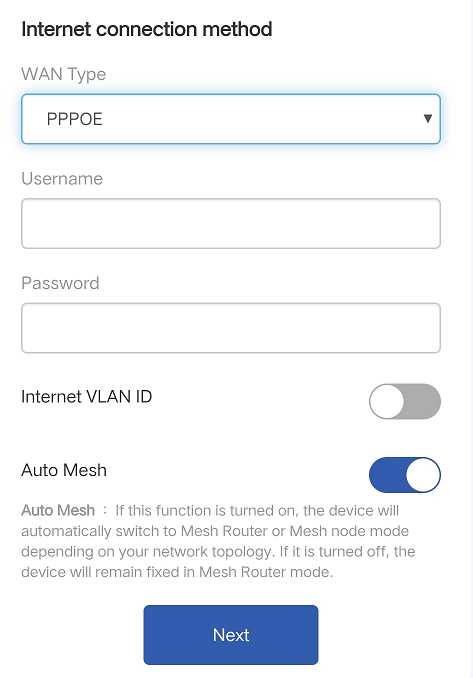
PPPOE
Username and password provided by the service provider (ISP) : The account name and password usually provided to you by the ISP for establishing a PPPoE connection.
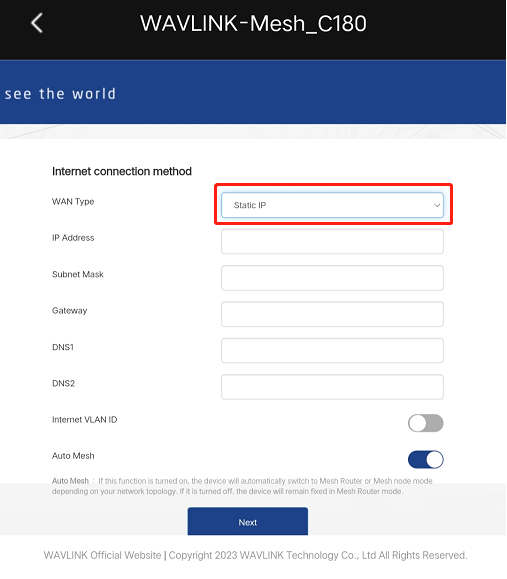
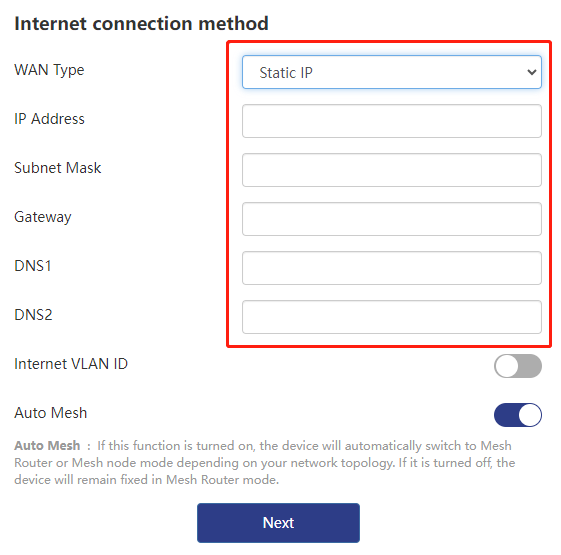
Static IP
IP Address : You need to assign a static IP address to your device. Make sure the IP address is unique on your network and is on the correct subnet.
Subnet Mask : Determine the subnet mask you use. A common subnet mask is 255.255.255.0.
Default gateway : Enter the default gateway IP address of your network device (check the user manual).
DNS server : You can use the DNS server provided by your ISP, or choose another public DNS server, such as Google DNS (8.8.8.8) or Cloudflare DNS (1.1.1.1).
-
Internet VLAN ID : Some ISPs require users to set a VLAN ID on the router before they can access the Internet. If you find that dialing fails or obtaining an IP from the ISP fails, please check whether you need to set a VLAN ID.
-
Auto Mesh : If this function is turned on, the device will automatically switch to Mesh Router or Mesh node mode depending on your network topology. If it is turned off, the device will remain fixed in Mesh Router mode.
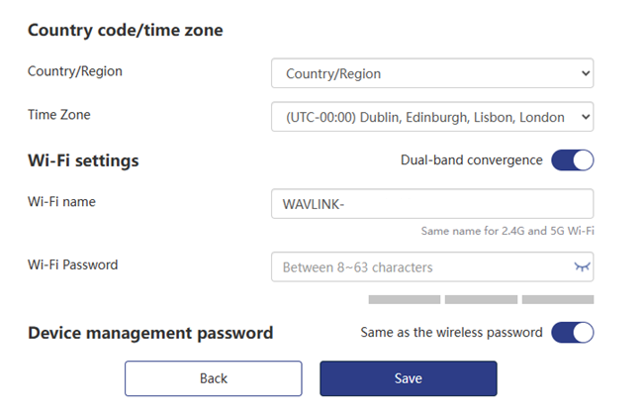
10 . After selecting the Internet connection method, enter the basic configuration (time zone, country, WiFi name, etc.) interface, select the time zone and region that suits your location, and customize your WiFi name and password (it is recommended that you use a strong password : The password contains uppercase and lowercase letters, numbers, and special symbols such as " @, ?, * ", etc.).
Tip
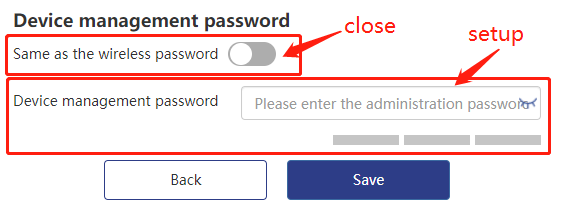
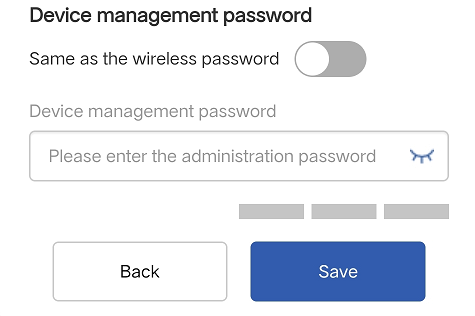
Device management password : You can set it the same as the wireless password, or you can turn off the button to set the device management password and wireless password separately.
11 . After setting, click Save and wait for the device configuration to be completed. After the Refresh button appears, click " Refresh " to complete the initial setting of the device.
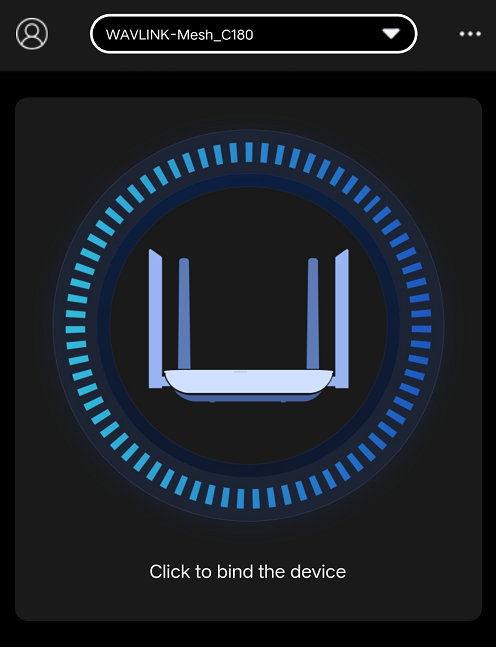
12 . After refreshing, the APP will jump to the interface shown below. You only need to click the icon  in the upper left corner to return to the main interface to bind the device.
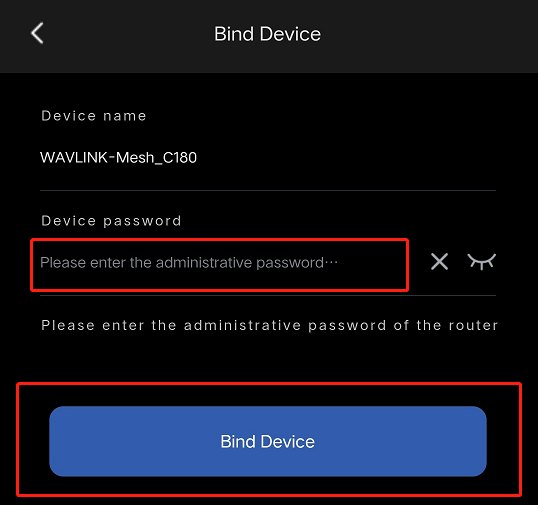
13 . In order to manage your wavlink device more conveniently, you need bind your device according to the instructions in the picture. The next time you log in, the APP will automatically identify the device and bind it, so there is no need to bind it manually.
14 . After entering the correct password, the device binding is completed. This password is the device management password. Below are some functions of the APP. If you are interested in learning more, you can click to view them.
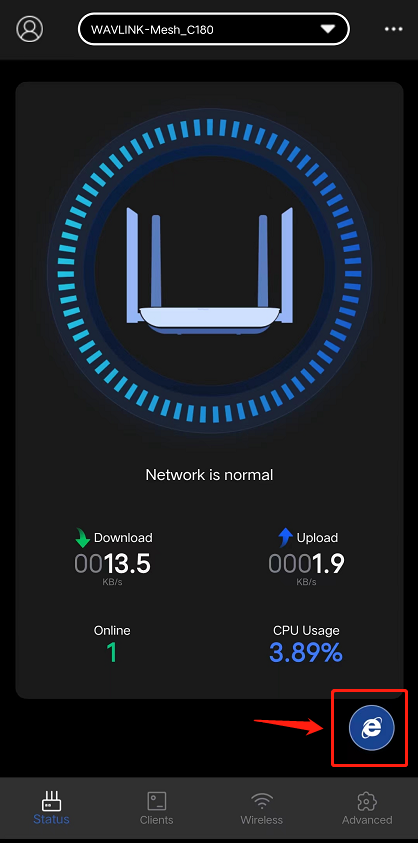
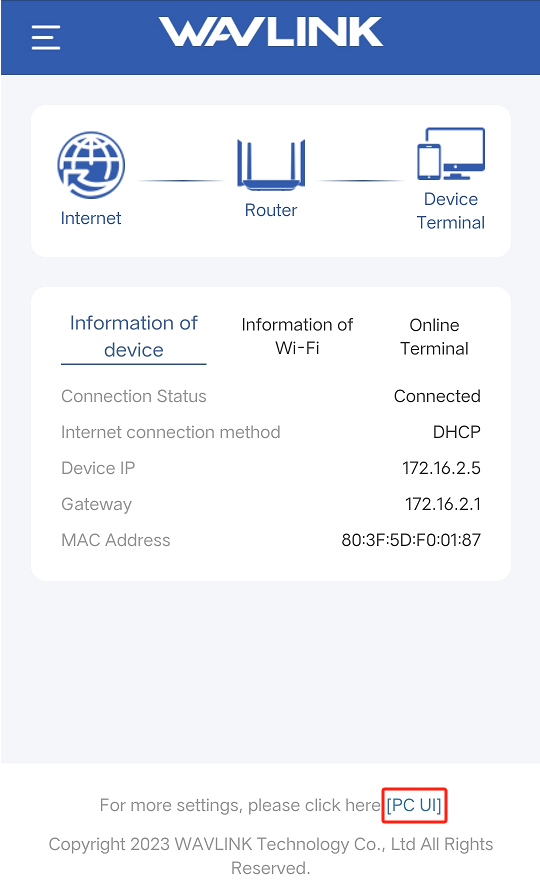
15 . After binding, you will see the following interface and "Network is normal" is displayed.If you need more functional configurations, you can enter the [PC UI] of the device management interface to set up. Just click the browser icon below to enter.
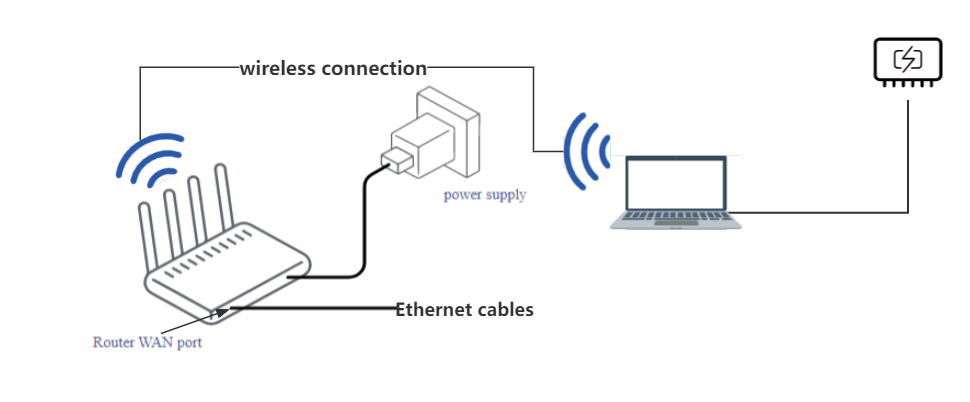
1 . Tools required : Desktop/laptop, two Ethernet cables, router, Ethernet converter
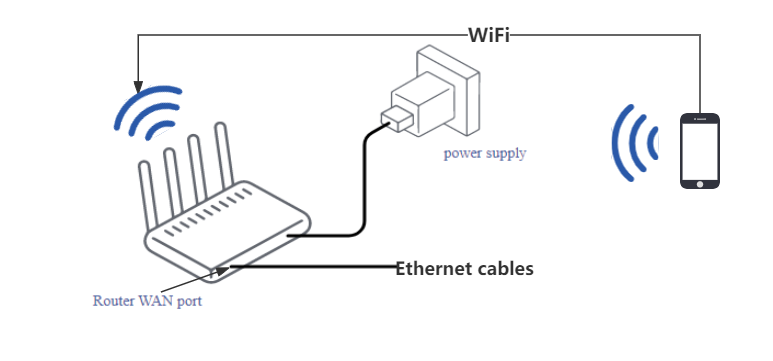
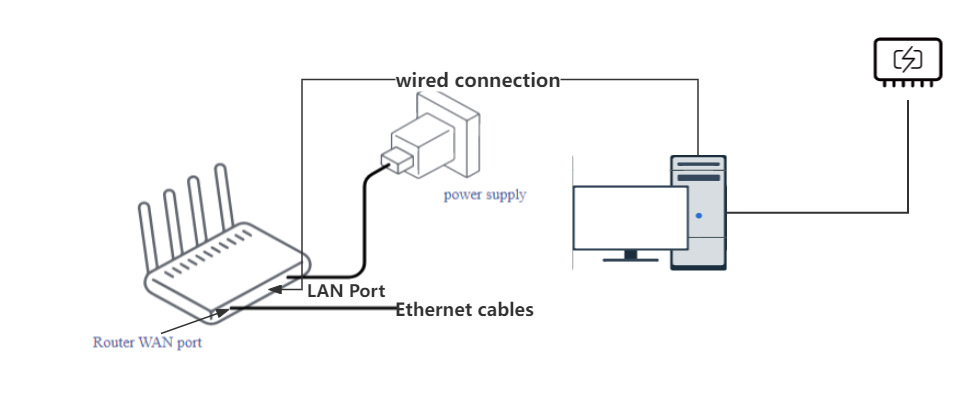
2 . Connection methods : wireless connection and wired connection.Whether it is a wired connection or a wireless connection, you need to power on the device and connect the Ethernet cable to the wan port of the router. As shown below.
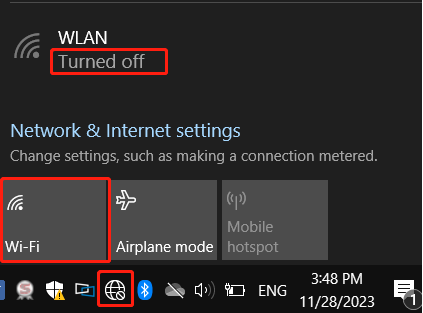
 (this status of the icon indicates that the computer is not connected to the network), and a wireless connection pop-up window will appear,enable the WiFi function ,find your default WiFi name and click to connect to WiFi.
Default WiFi name
The default WiFi name can be found in the user manual or the product bottom label.
SSID(Click to learn about SSID) : WAVLINK-XXXX_XXXX
"XXXX" in SSID is for illustrative purposes only, please refer to the last 4 digits of the MAC address of the label on the bottomof the product.
① To use wired access to the Internet, connect an Ethernet cable between the router's wan port and the Ethernet port on your computer. If your computer doesn't have an Ethernet port, try using a USB to Ethernet adapter.
② Connect one end of the first network cable to the network port of the computer, the other end to the LAN port of the router, and the second ISP network cable to the wan port of the computer.The device will automatically identify the network.
③ After successful connection, this icon "  " will be displayed on the computer taskbar.
3 . New devices or reset devices need to log in to the administrator interface for initialization settings.
4 . There are two ways to log in to the wavlink router management interface :
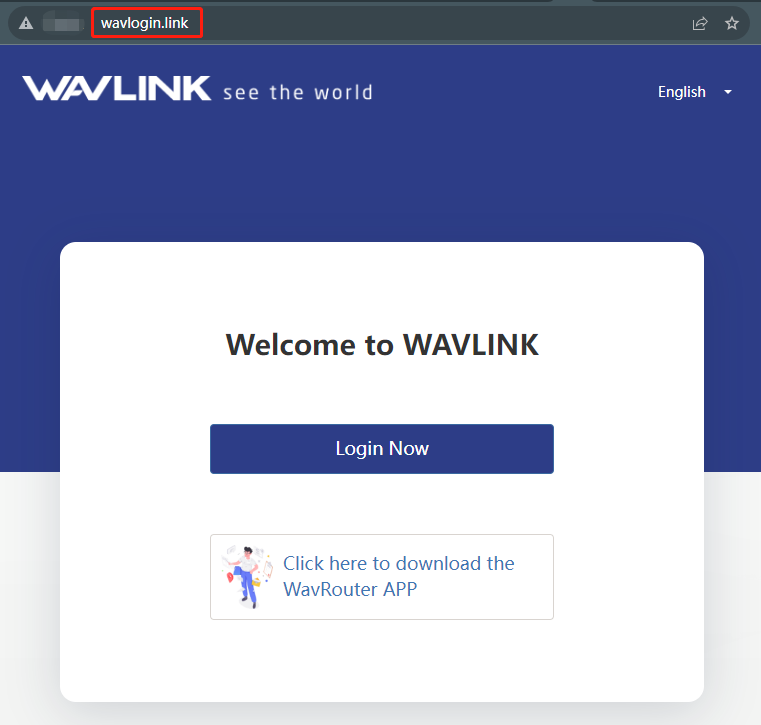
Log in using the domain name http://wavlogin.link. (It is recommended that you use a domain name to log in. If you fail to log in using a domain name, please try to log in using an IP address.)
Log in using your IP address http://192.168.20.1.(If you want to log in using your IP address, please refer to the steps below.)

About IP address(192.168.20.1)
Different devices have different IP addresses. For specific IP addresses, please refer to the specific device manual or the actual acquisition of the device.For the actual method of obtaining an IP address, refer to the following steps.
Click here to learn how to obtain the IP address of your router.
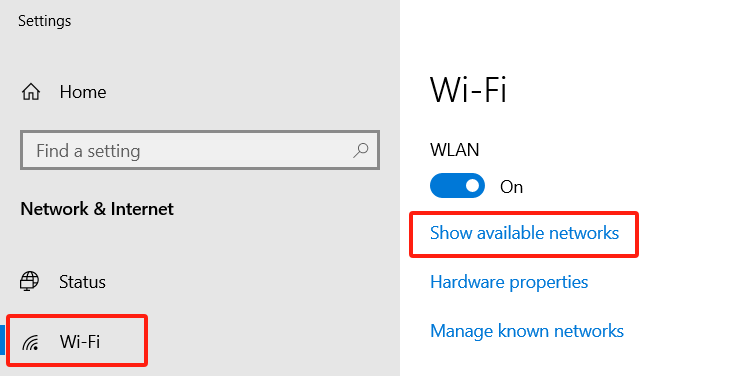
1 . Click win  , the navigation bar will pop up,click settings
 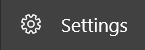 in the navigation bar to enter the computer settings page, and click WiFi on the settings page.
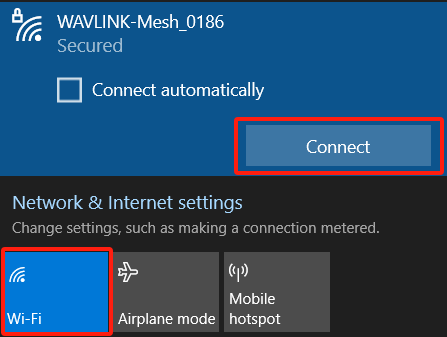
2 . Click Show available networks to pop up the following interface, find the device's default WiFi name and click Connect.(The default WiFi name can be found in the user manual or the product bottom label.)
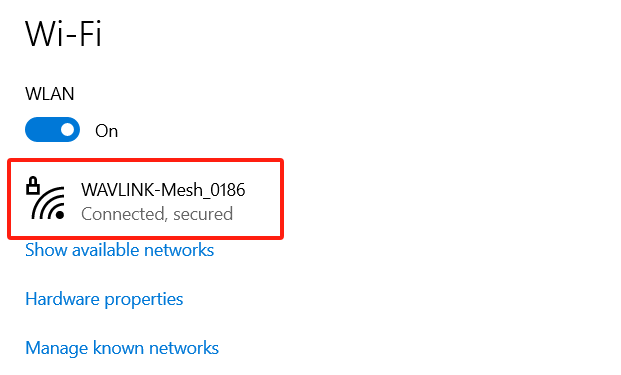
3 . This icon will be converted to this icon  after the connection is successful.Enter the WiFi settings page, click on the Connected WiFi column to enter the WiFi detailed information interface.
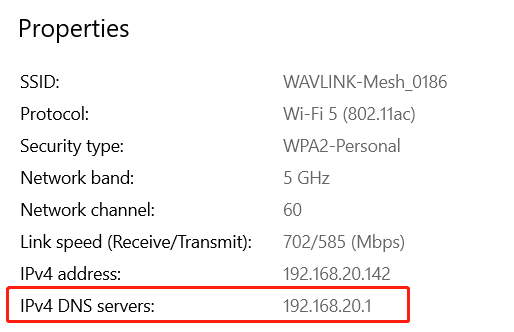
4 . Find the IPv4 DNS Server connected to WiFi, copy the IP address, and paste the IP address in the address bar of the browser to enter the router management interface.
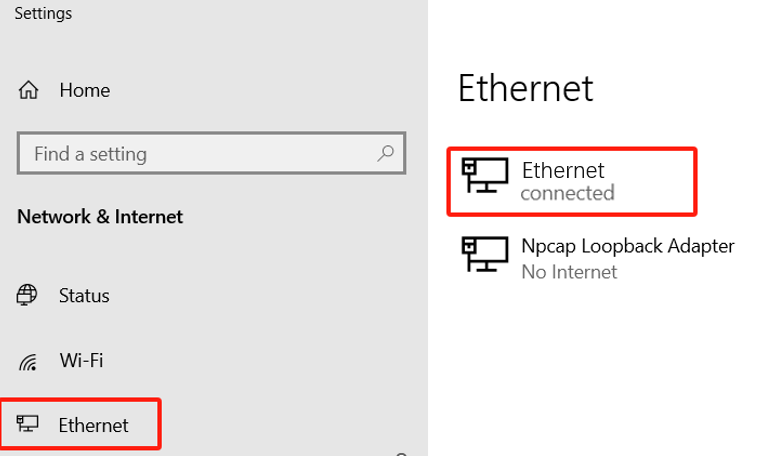
1 . Move the mouse to " " on the computer taskbar and right-click.

2 . Select Go to Settings, click Ethernet, and view the IPv4 DNS Servers.
3 . Press and hold the left button of the mouse to select the IP address, then right-click and select Copy.
4 . Double-click the browser icon, open the browser (Microsoft edge, Google, etc.), and paste the IP address you just copied in the address bar, or manually enter http://192.168.x.x .
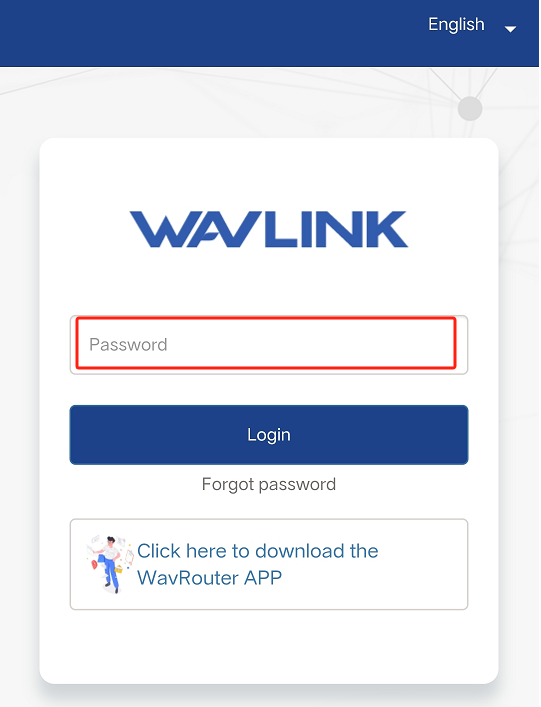
5 . After entering the website, the password for the first login page is the default password, which is admin. After entering the default password, press the "Enter" key on the keyboard or click "Login" with the mouse.
6 . After entering the initial configuration interface, the device system will automatically detect the Internet connection method for you. The Internet connection method defaults to DHCP. If you need to change the Internet connection method, please click the information box below.
-
Internet VLAN ID : Some ISPs require users to set a VLAN ID on the router before they can access the Internet. If you find that dialing fails or obtaining an IP from the ISP fails, please check whether you need to set a VLAN ID.
-
Auto Mesh : If this function is turned on, the device will automatically switch to Mesh Router or Mesh node mode depending on your network topology. If it is turned off, the device will remain fixed in Mesh Router mode.
Please click here to switch the Internet connection method
After entering the initial configuration page, you need to choose a internet connection method. DHCP is selected by default. If you need to connect to the Internet through dial-up, please choose PPPoE. If you need to configure a static IP, please choose Static IP. We have three internet connection methods. A link description is attached below, you can click on the link for details.
PPPOE
Username and password provided by the service provider (ISP) : The account name and password usually provided to you by the ISP for establishing a PPPoE connection.
Static IP
IP Address : You need to assign a static IP address to your device. Make sure the IP address is unique on your network and is on the correct subnet.
Subnet Mask : Determine the subnet mask you use. A common subnet mask is 255.255.255.0.
Default gateway : Enter the default gateway IP address of your network device (check the user manual).
DNS server : You can use the DNS server provided by your ISP, or choose another public DNS server, such as Google DNS (8.8.8.8) or Cloudflare DNS (1.1.1.1).
-
Internet VLAN ID : Some ISPs require users to set a VLAN ID on the router before they can access the Internet. If you find that dialing fails or obtaining an IP from the ISP fails, please check whether you need to set a VLAN ID.
-
Auto Mesh : If this function is turned on, the device will automatically switch to Mesh Router or Mesh node mode depending on your network topology. If it is turned off, the device will remain fixed in Mesh Router mode.
Please click on the link below to learn more
Differences in Internet access methods.Which Internet method should I choose?
7 . After selecting the Internet access method, enter the basic configuration (time zone, country, WiFi name, etc.) interface, select your country and time zone, and customize your WiFi name, password, and device management password (it is recommended that you use a strong password : The password contains uppercase and lowercase letters, numbers, and special symbols such as " @, ?, * ", etc.).
Please remember the password you set. After the configuration is completed and the interface is refreshed, you will use your customized password to log in to the management interface again.
Tip
Device management password : You can set it the same as the wireless password, or you can turn off the button to set the device management password and wireless password separately.
8 . After setting, click Save and wait for the device configuration to be completed. After the Refresh button appears, click Refresh to complete the initial setting of the device.
App Download
Scan the QR code with your mobile phone to download the Wav router app and manage your device conveniently.
9 . After clicking Refresh, you need to re-enter the login password. This login password is the password you customized. After entering the password, click Login to log in. After successful login, you can see the following page.
This page is the device management interface. You can configure all functions of the router on this page. If you need to know more, please click for more feature details.
Forgot password solution
Please press and hold the reset button on the router for more than 6 seconds. After the router reset, you can log in with the default password.
1 . Tools required: Wavlink router, Apple computer, network cable, Ethernet converter, Ethernet cable.
2 . Connection methods: wireless connection and wired connection.Whether it is a wired connection or a wireless connection, you need to power on the device and connect the Ethernet cable to the wan port of the router. As shown below.
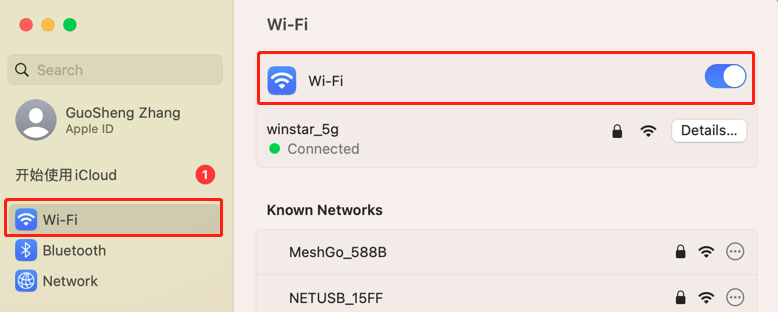
 ➡
➡  , enter the WiFi settings page to enable the WiFi function.
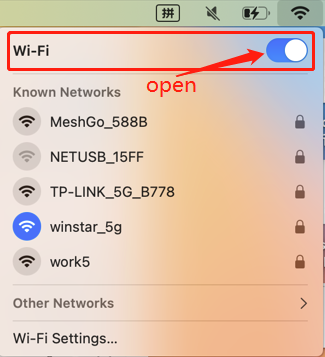
Or click the icon  on the system bar to enable the WiFi function.
Default WiFi name
The default WiFi name can be found in the user manual or the product bottom label.
SSID : WAVLINK-XXXX_XXXX
"XXXX" in SSID is for illustrative purposes only, please refer to the last 4 digits of the MAC address of the label on the bottomof the product.
② After the connection is successful, the device will automatically identify the network.
3 . New devices or reset devices need to log in to the administrator interface for initialization settings.
4 . There are two ways to log in to the wavlink router management interface :
Log in using the domain name http://wavlogin.link. (It is recommended that you use a domain name to log in. If you fail to log in using a domain name, please try to log in using an IP address.)
Log in using your IP address http://192.168.20.1.(If you want to log in using your IP address, please refer to the steps below.)
About IP address(192.168.20.1)
Different devices have different IP addresses. For specific IP addresses, please refer to the specific device manual or the actual acquisition of the device.For the actual method of obtaining an IP address, refer to the following steps.
Click here to learn how to obtain the IP address of your router.
① After the connection is successful, "connected" is displayed. Click "Details" to the right of the WiFi name to view the Router IP.


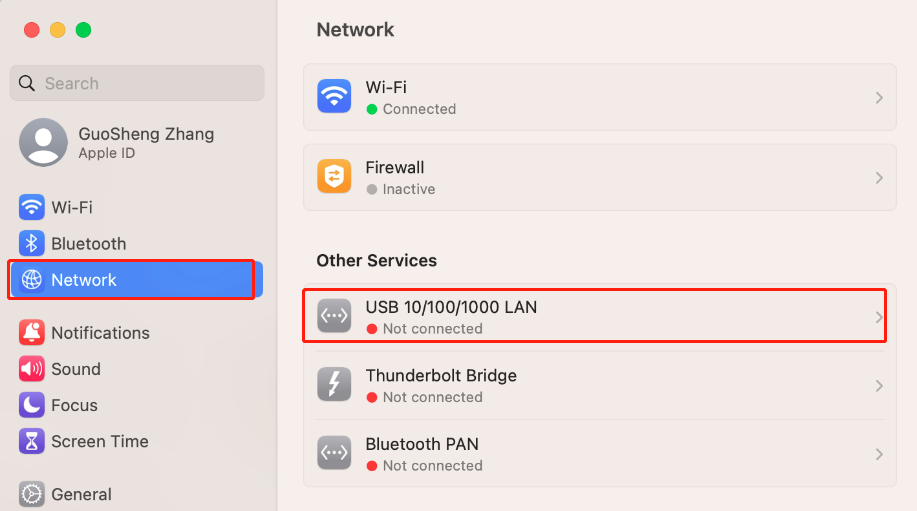
① Click the setting icon to enter the network under the setting page.
② After entering the network,click this column . 
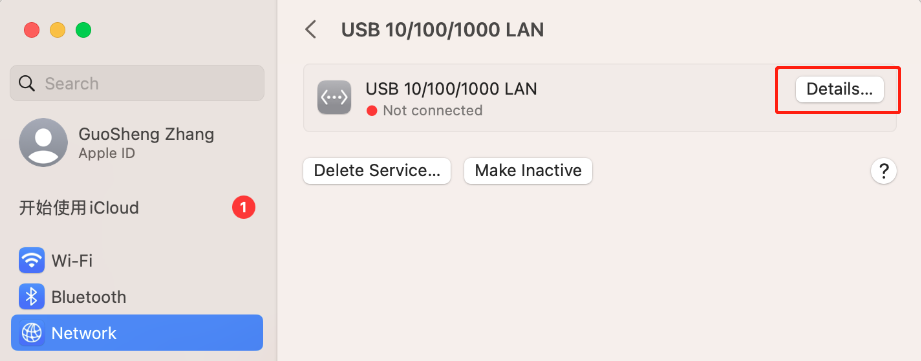
③ Click Details to view the IP information. For subsequent setting steps, refer to wireless connection.
5 . Copy the address, open the browser, enter http://192.168.20.1 in the address bar and press Enter on the keyboard to enter the router management page.
6 . After entering the initial configuration interface, the device system will automatically detect the Internet connection method for you. The Internet connection method defaults to DHCP. If you need to change the Internet connection method, please click the information box below.
-
Internet VLAN ID : Some ISPs require users to set a VLAN ID on the router before they can access the Internet. If you find that dialing fails or obtaining an IP from the ISP fails, please check whether you need to set a VLAN ID.
-
Auto Mesh : If this function is turned on, the device will automatically switch to Mesh Router or Mesh node mode depending on your network topology. If it is turned off, the device will remain fixed in Mesh Router mode.
Please click here to switch the Internet connection method
After entering the initial configuration page, you need to choose a internet connection method. DHCP is selected by default. If you need to connect to the Internet through dial-up, please choose PPPOE. If you need to configure a static IP, please choose Static IP. We have three internet connection methods. A link description is attached below, you can click on the link for details.
PPPOE
Username and password provided by the service provider (ISP) : The account name and password usually provided to you by the ISP for establishing a PPPoE connection.
Static IP
IP Address : You need to assign a static IP address to your device. Make sure the IP address is unique on your network and is on the correct subnet.
Subnet Mask : Determine the subnet mask you use. A common subnet mask is 255.255.255.0.
Default gateway : Enter the default gateway IP address of your network device (check the user manual).
DNS server : You can use the DNS server provided by your ISP, or choose another public DNS server, such as Google DNS (8.8.8.8) or Cloudflare DNS (1.1.1.1).
-
Internet VLAN ID : Some ISPs require users to set a VLAN ID on the router before they can access the Internet. If you find that dialing fails or obtaining an IP from the ISP fails, please check whether you need to set a VLAN ID.
-
Auto Mesh : If this function is turned on, the device will automatically switch to Mesh Router or Mesh node mode depending on your network topology. If it is turned off, the device will remain fixed in Mesh Router mode.
Please click on the link below to learn more
Differences in Internet access methods.Which Internet method should I choose?
7 . After configuring the Internet, select your time zone and country, and customize your WiFi name and password. For device management passwords, you can refer to the instructions below.(it is recommended that you use a strong password : The password contains uppercase and lowercase letters, numbers, and special symbols such as " @, ?, * ", etc.)
Tip
Device management password : You can set it the same as the wireless password, or you can turn off the button to set the device management password and wireless password separately.
8 . After setting all parameters, click Save. The device will start updating. After updating to 100%, click refresh.
App Download
Scan the QR code with your mobile phone to download the Wav router app and manage your device conveniently.
9 . After the refresh is successful, log in to the device management interface again, enter your customized password and click Login to log in.
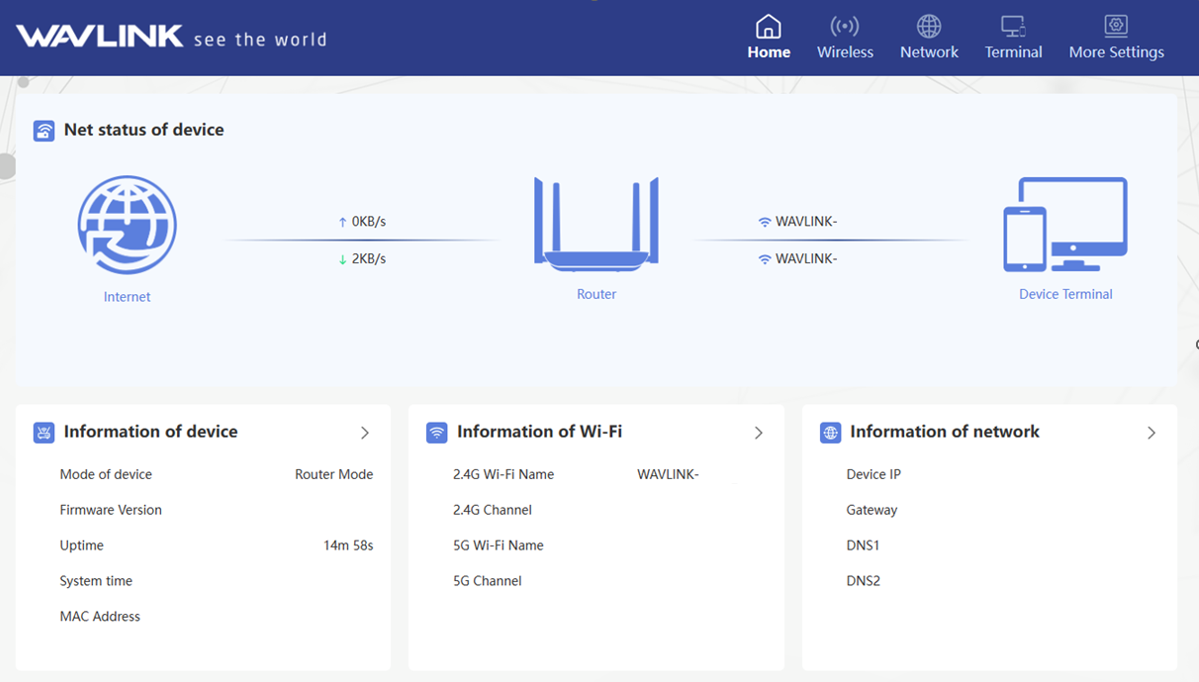
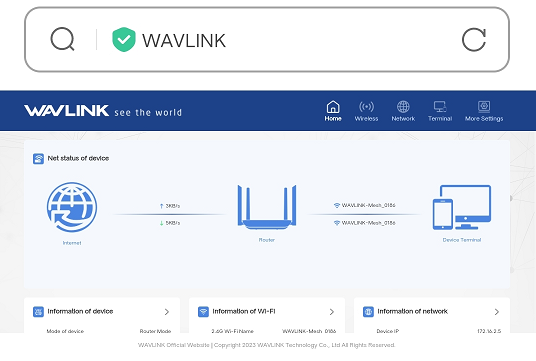
10 . After successful login, you will see the following interface. This interface is the administrator's homepage. You can manage and learn about your device on this interface. For more function details, please click More.
Forgot password solution
Please press and hold the reset button on the router for more than 6 seconds. After the router reset, you can log in with the default password.
Tools needed : mobile phone, router.
New devices or reset devices need to log in to the administrator interface for initialization settings.
There are two ways to log in to the wavlink router management interface :
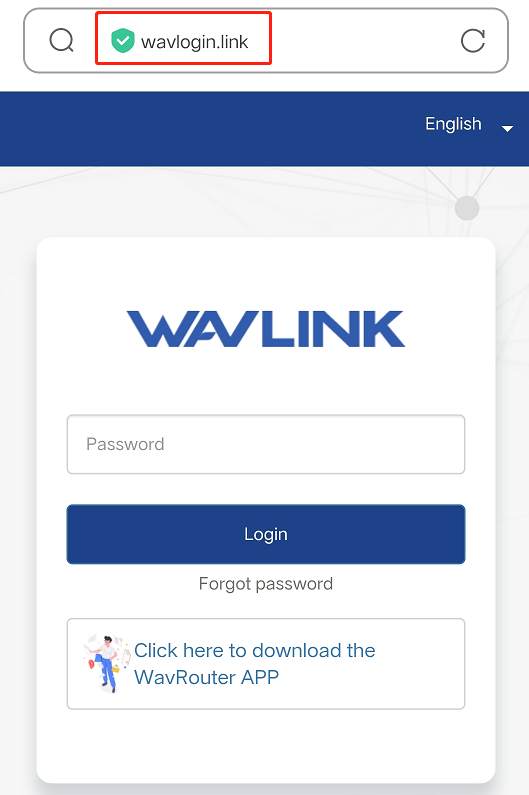
Log in using the domain name http://wavlogin.link. (It is recommended that you use a domain name to log in. If you fail to log in using a domain name, please try to log in using an IP address.)
- Log in using your IP address http://192.168.20.1.
About IP address(192.168.20.1)
Different devices have different IP addresses. For specific IP addresses, please refer to the specific device manual.
1 . Connect the ISP network cable to the wan port of the router. After successful connection, the device will automatically identify the network.
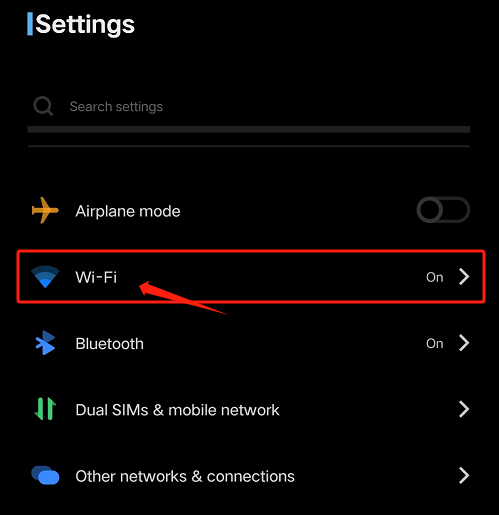
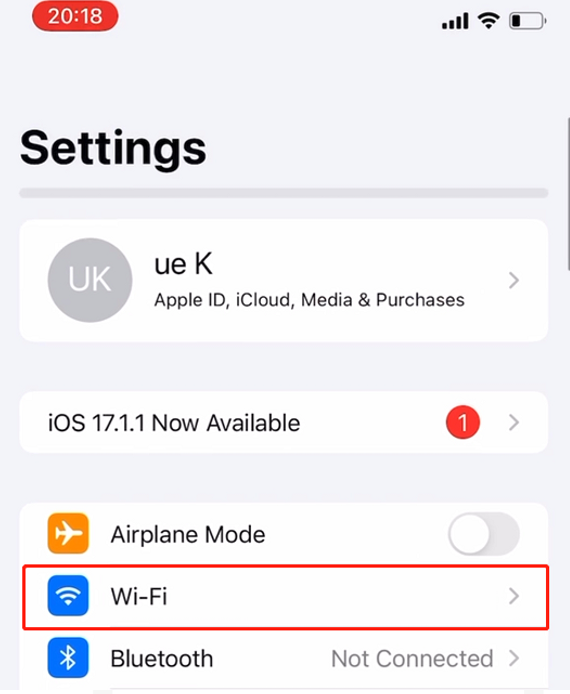
2 . Open the phone and enter the system settings, click WiFi to enter the WiFi settings page and click to turn on WiFi.
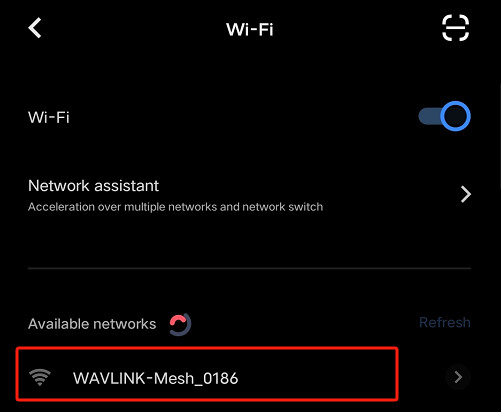
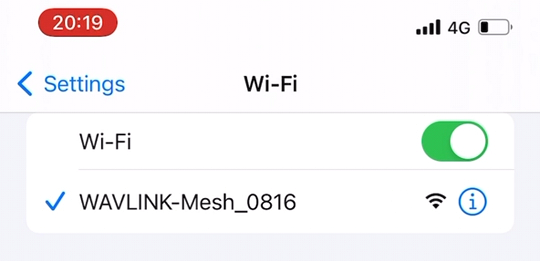
3 . Find the WiFi shown on the router on the WiFi interface (the WiFi name is recorded in the user manual, you can check the user manual to find out), and click Connect.
Tip
There is no password when connecting to WiFi for the first time.
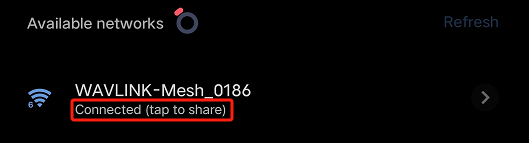
4 . The picture after successful connection is as shown below.
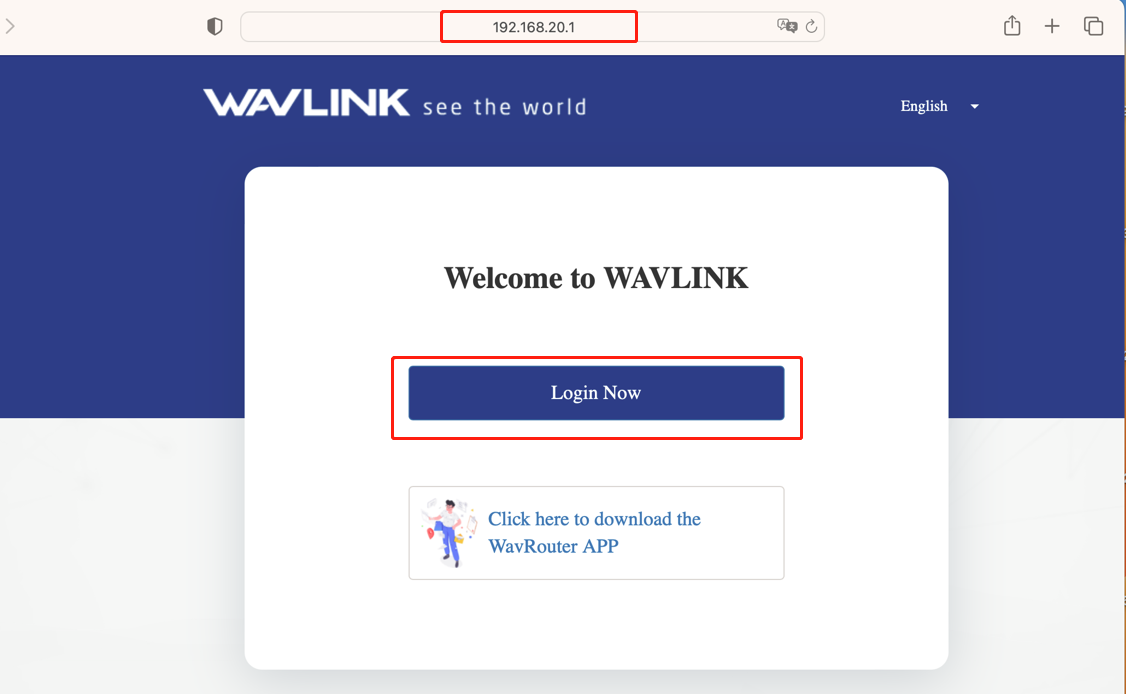
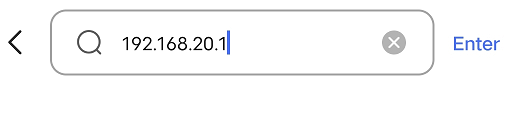
5 . Open the mobile browser and enter the IP address (can be found in the user manual, usually 192.168.x.x), as shown below, click " Enter " to enter the router management interface.
6 . Enter the default password admin and click "Login Now " to enter the first-time setup page.
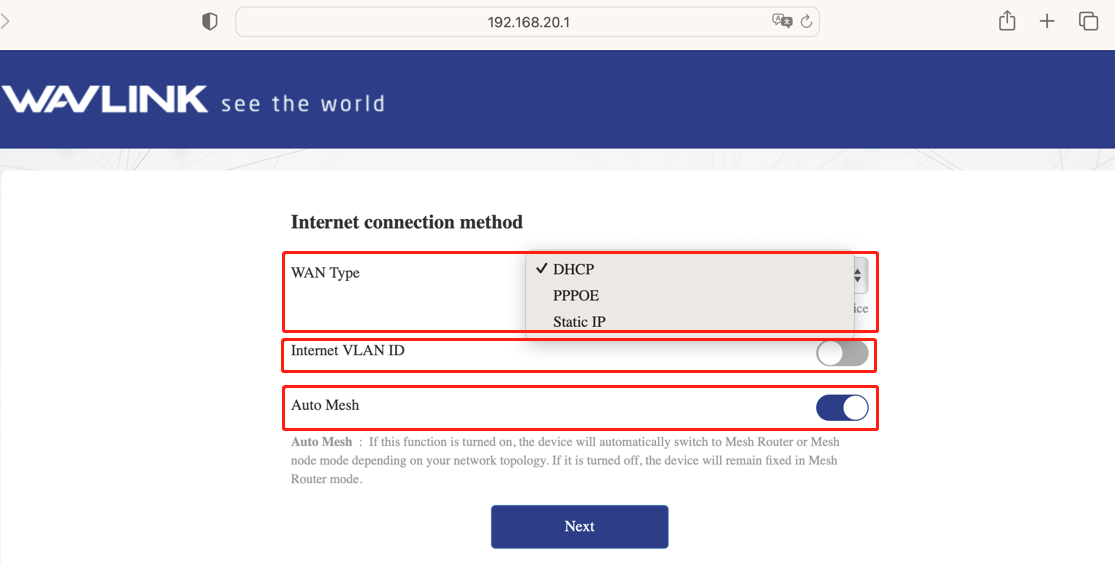
7 . After entering the initial configuration interface, the device system will automatically detect the Internet connection method for you. The Internet connection method defaults to DHCP. If you need to change the Internet connection method, please click the information box below.
-
Internet VLAN ID : Some ISPs require users to set a VLAN ID on the router before they can access the Internet. If you find that dialing fails or obtaining an IP from the ISP fails, please check whether you need to set a VLAN ID.
-
Auto Mesh : If this function is turned on, the device will automatically switch to Mesh Router or Mesh node mode depending on your network topology. If it is turned off, the device will remain fixed in Mesh Router mode.
Please click here to switch the Internet connection method
After entering the initial configuration page, you need to choose a internet connection method. DHCP is selected by default. If you need to connect to the Internet through dial-up, please choose PPPOE. If you need to configure a static IP, please choose Static IP. We have three internet connection methods. A link description is attached below, you can click on the link for details.
PPPOE
Username and password provided by the service provider (ISP) : The account name and password usually provided to you by the ISP for establishing a PPPoE connection.
Static IP
IP Address : You need to assign a static IP address to your device. Make sure the IP address is unique on your network and is on the correct subnet.
Subnet Mask : Determine the subnet mask you use. A common subnet mask is 255.255.255.0.
Default gateway : Enter the default gateway IP address of your network device (check the user manual).
DNS server : You can use the DNS server provided by your ISP, or choose another public DNS server, such as Google DNS (8.8.8.8) or Cloudflare DNS (1.1.1.1).
-
Internet VLAN ID : Some ISPs require users to set a VLAN ID on the router before they can access the Internet. If you find that dialing fails or obtaining an IP from the ISP fails, please check whether you need to set a VLAN ID.
-
Auto Mesh : If this function is turned on, the device will automatically switch to Mesh Router or Mesh node mode depending on your network topology. If it is turned off, the device will remain fixed in Mesh Router mode.
Please click on the link below to learn more
Differences in Internet access methods.Which Internet method should I choose?
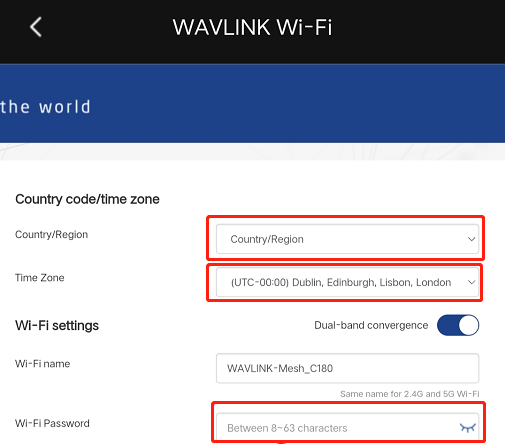
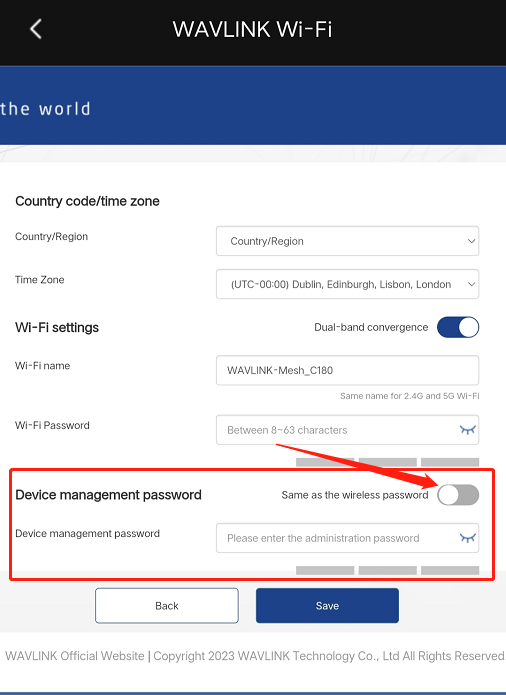
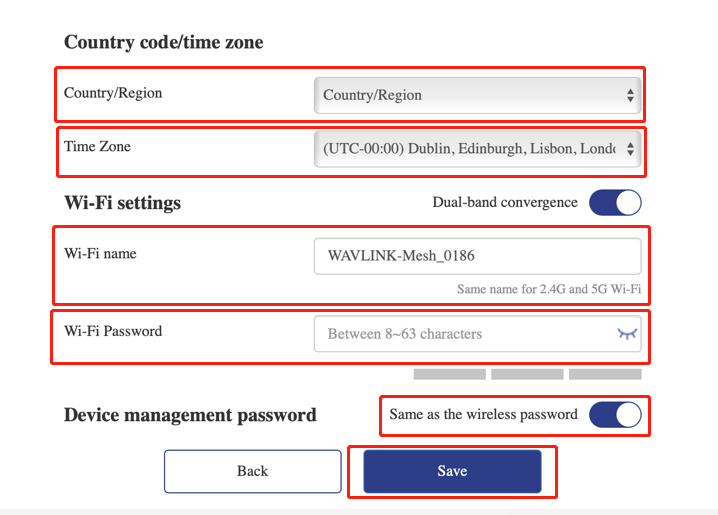
8 . After selecting the Internet access method, enter the basic configuration (time zone, country, WiFi name, etc.) interface, select the time zone and region that suits your location, and customize your WiFi name and password (it is recommended that you use a strong password : The password contains uppercase and lowercase letters, numbers, and special symbols such as " @, ?, * ", etc.).

Tip
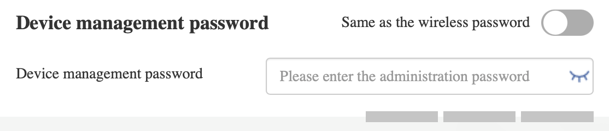
Device management password : You can set it the same as the wireless password, or you can turn off the button to set the device management password and wireless password separately.
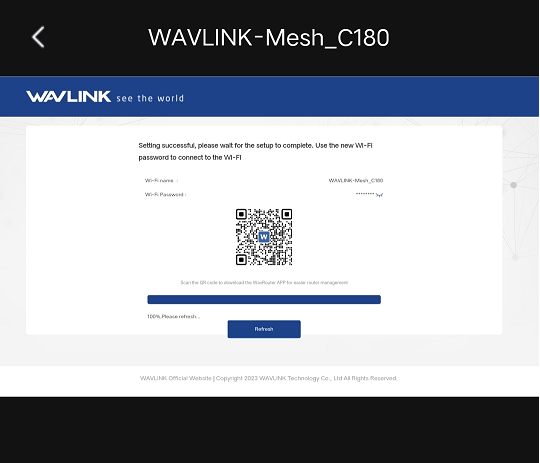
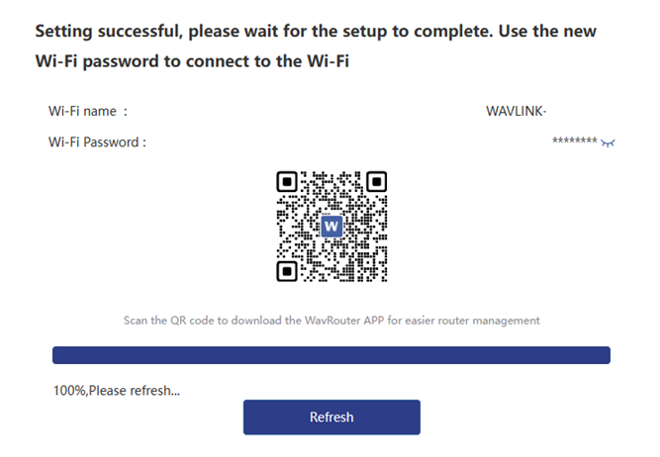
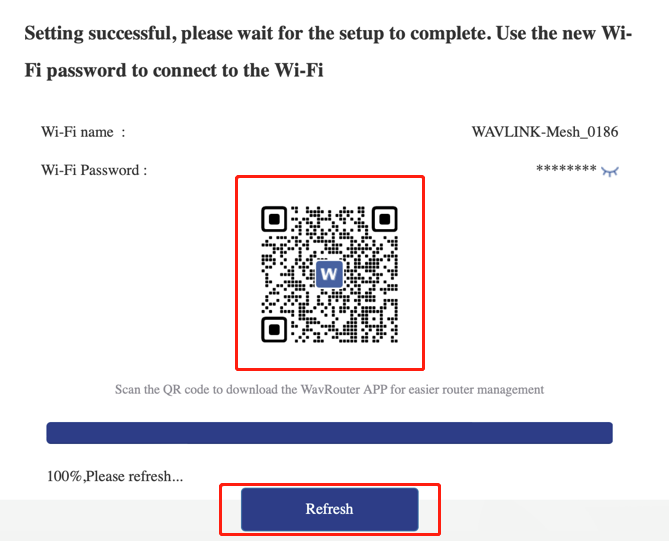
9 . After setting, click Save and wait for the device configuration to be completed. After the Refresh button appears, click " Refresh " to complete the initial setting of the device.

App Download
Scan the QR code with your mobile phone to download the Wav router app and manage your device conveniently.
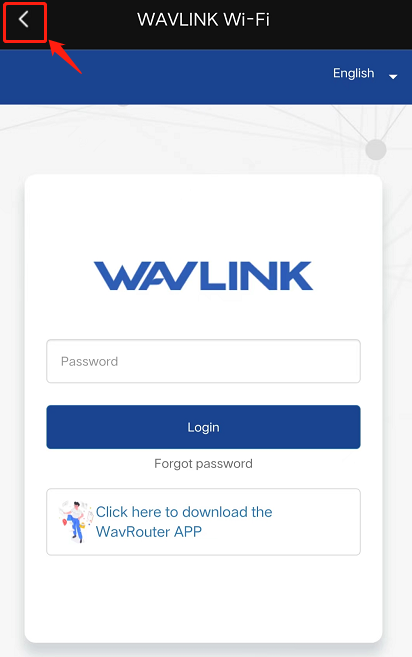
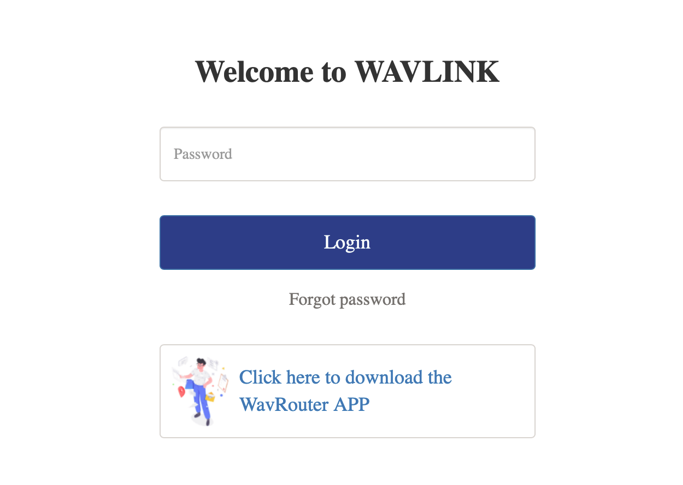
10 . After clicking Refresh in the previous step, you need to re-enter the login password. This login password is the password you customized. After entering the password, click Login to log in. After successful login, you can see the following page.
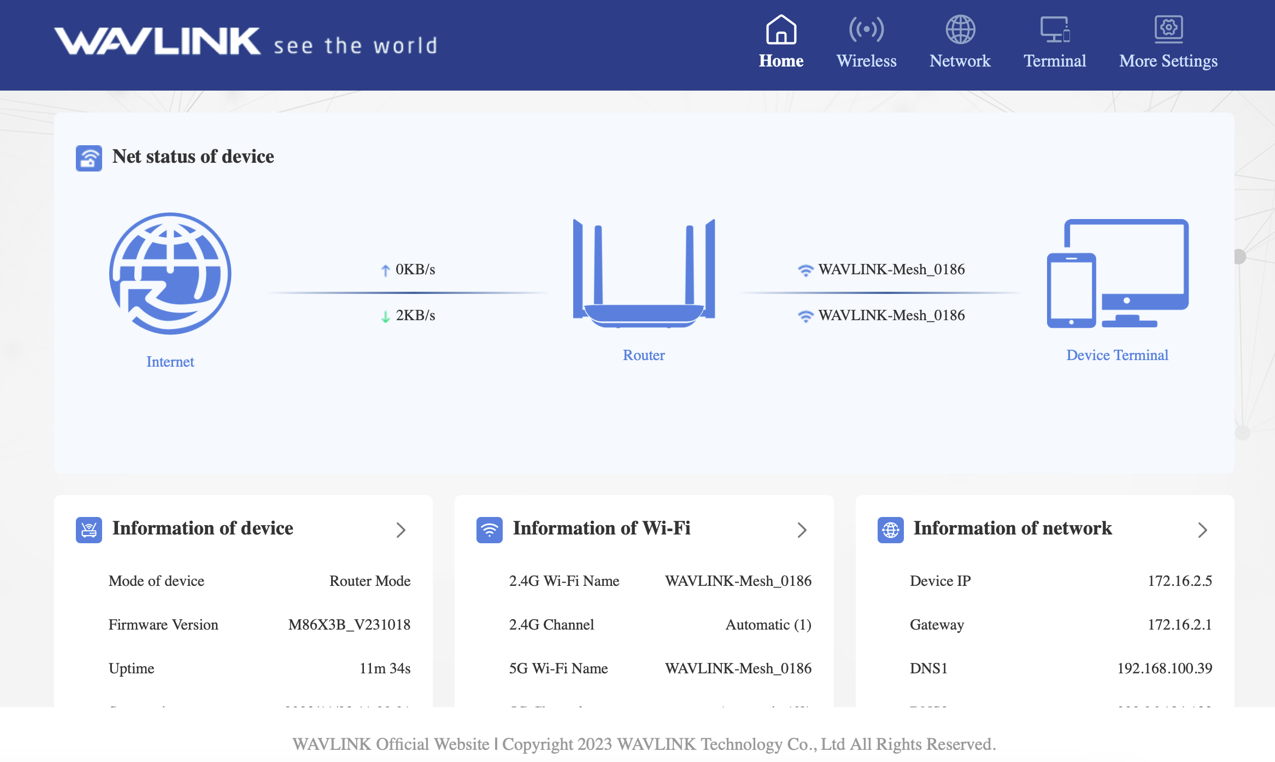
11 . This page is the device management interface. You can configure all functions of the router on this page. You can also click [PC UI] to switch to the computer version. If you need more information, click more feature to learn more.
After the switch is successful, as shown in the figure below.
Forgot password solution
Please press and hold the reset button on the router for more than 6 seconds. After the router reset, you can log in with the default password.
Tools needed : mobile phone, router.
New devices or reset devices need to log in to the administrator interface for initialization settings.
There are two ways to log in to the wavlink router management interface :
Log in using the domain name http://wavlogin.link. (It is recommended that you use a domain name to log in. If you fail to log in using a domain name, please try to log in using an IP address.)
Log in using your IP address http://192.168.20.1.
About IP address(192.168.20.1)
Different devices have different IP addresses. For specific IP addresses, please refer to the specific device manual.
1 . Connect the ISP network cable to the wan port of the router. After successful connection, the device will automatically identify the network.
2 . Open the phone and enter the system settings, click WiFi to enter the WiFi settings page and click to turn on WiFi.
3 . Find the WiFi shown on the router on the WiFi interface (the WiFi name is recorded in the user manual, you can check the user manual to find out), and click Connect.

Tip
There is no password when connecting to WiFi for the first time.
4 . The picture after successful connection is as shown below.
6 . Enter the default password admin and click "Login Now " to enter the first-time setup page.
7 . After entering the initial configuration interface, the device system will automatically detect the Internet connection method for you. The Internet connection method defaults to DHCP. If you need to change the Internet connection method, please click the information box below.
-
Internet VLAN ID : Some ISPs require users to set a VLAN ID on the router before they can access the Internet. If you find that dialing fails or obtaining an IP from the ISP fails, please check whether you need to set a VLAN ID.
-
Auto Mesh : If this function is turned on, the device will automatically switch to Mesh Router or Mesh node mode depending on your network topology. If it is turned off, the device will remain fixed in Mesh Router mode.
Please click here to switch the Internet connection method
After entering the initial configuration page, you need to choose a internet connection method. DHCP is selected by default. If you need to connect to the Internet through dial-up, please choose PPPOE. If you need to configure a static IP, please choose Static IP. We have three internet connection methods. A link description is attached below, you can click on the link for details.
PPPOE
Username and password provided by the service provider (ISP) : The account name and password usually provided to you by the ISP for establishing a PPPoE connection.
Static IP
IP Address : You need to assign a static IP address to your device. Make sure the IP address is unique on your network and is on the correct subnet.
Subnet Mask : Determine the subnet mask you use. A common subnet mask is 255.255.255.0.
Default gateway : Enter the default gateway IP address of your network device (check the user manual).
DNS server : You can use the DNS server provided by your ISP, or choose another public DNS server, such as Google DNS (8.8.8.8) or Cloudflare DNS (1.1.1.1).
-
Internet VLAN ID : Some ISPs require users to set a VLAN ID on the router before they can access the Internet. If you find that dialing fails or obtaining an IP from the ISP fails, please check whether you need to set a VLAN ID.
-
Auto Mesh : If this function is turned on, the device will automatically switch to Mesh Router or Mesh node mode depending on your network topology. If it is turned off, the device will remain fixed in Mesh Router mode.
Please click on the link below to learn more
Differences in Internet access methods.Which Internet method should I choose?
8 . After selecting the Internet access method, enter the basic configuration (time zone, country, WiFi name, etc.) interface, select the time zone and region that suits your location, and customize your WiFi name and password (it is recommended that you use a strong password : The password contains uppercase and lowercase letters, numbers, and special symbols such as " @, ?, * ", etc.).
Tip
Device management password : You can set it the same as the wireless password, or you can turn off the button to set the device management password and wireless password separately.
9 . After setting, click Save and wait for the device configuration to be completed. After the Refresh button appears, click " Refresh " to complete the initial setting of the device.
App Download
Scan the QR code with your mobile phone to download the Wav router app and manage your device conveniently.
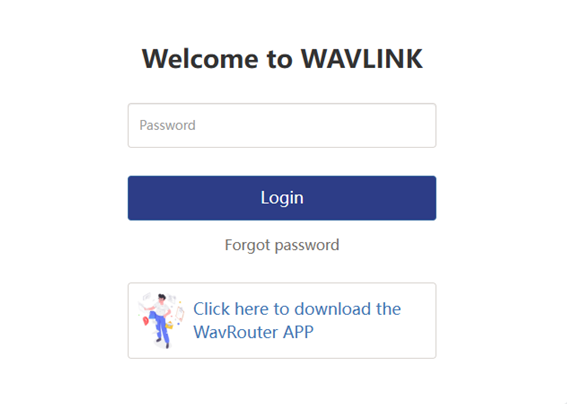
11 . After clicking Refresh in the previous step, you need to re-enter the login password. This login password is the password you customized. After entering the password, click Login to log in. After successful login, you can see the following page.
12 . This page is the device management interface. You can configure all functions of the router on this page. You can also click [PC UI] to switch to the computer version. If you need more information, click more feature to learn more.
After the switch is successful, as shown in the figure below.
Forgot password solution
Please press and hold the reset button on the router for more than 6 seconds. After the router reset, you can log in with the default password.
Setup complete! Still have questions? Please don’t hesitate to email contact@wavlink.com to provide feedbacks or contact online customer service, thank you !